Introduction
Walk into a truly luxurious kitchen and notice what you don’t see: no toaster, no kettle, no paper towels, no fridge looming like an appliance showroom. The counters are clear, the lines are calm, and everything you need is exactly one hidden motion away. That serenity isn’t minimalism for its own sake — it’s storage engineering.
Concealed storage is the defining move of high-end kitchen design in 2026. Not more cabinets, but smarter ones: appliances that vanish behind furniture-grade fronts, pantries hidden in plain sight, and every centimeter — including the 10 cm of toe-kick you’ve been ignoring — put to work. The result is a kitchen that looks like a calm living space and functions like a professional one.
Below is a quick primer on how designers think about hidden storage, then ten concealed designs to steal — from the classic appliance garage to the toe-kick drawer most people don’t know exists.
Concealed Storage 101: Think Like a Designer
Four principles before you start hiding things:
- Plan storage before appliances. Designers spec the storage system first, then choose appliances to fit it — not the reverse. A 60 cm appliance garage bay, a 90 cm integrated fridge column, a 120 cm pantry wall: these are dimensions you decide on paper, before a single cabinet is ordered.
- Drawers beat doors, always. A deep drawer gives you 100% visibility and reach; a base cabinet with a door gives you roughly 40% (the rest is archaeology). In concealed luxury kitchens, nearly all lower storage is drawers — doors are reserved for tall units and pantries.
- Light the inside. A hidden pantry or deep larder without interior lighting is a black hole you’ll stop using. LED strips on door sensors cost little and change everything — you see every jar, nothing expires in the dark.
- Ventilate anything with a motor. Coffee machines, microwaves, and toasters hidden in appliance garages generate heat and steam. Every enclosed appliance bay needs ventilation — a vented back panel, a gap at the top, or a dedicated extract. Skip this and you’ll cook your cabinetry.
Keep these in mind as you read the ten designs — each one assumes at least one of these rules.
1. The Appliance Garage
The original concealed-storage move, and still the highest-impact one. An appliance garage is a countertop-height cabinet with doors that disappear — pocket doors that slide back into the cabinet sides, or a tambour (roller) door that retracts upward — hiding the toaster, kettle, coffee machine, and all their cords behind a calm front. Closed, it’s just more cabinetry; open, it’s your full breakfast station.
The modern version is taller and deeper than the 1990s original: 60–75 cm high inside, 55–65 cm deep to swallow a stand mixer or espresso machine with room to spare. Pocket doors are the luxury choice — they vanish completely, leaving the opening fully clear — while tambour doors suit tighter budgets and narrower bays.
How to do it: Budget $800–$2,500 for a well-built appliance garage depending on door mechanism and interior fit-out. Line the interior with the same material as your backsplash for a finished look, add a power strip with 3–4 outlets inside (so nothing ever needs unplugging), and put it on the same LED sensor lighting as the rest of the kitchen. Ventilation is non-negotiable: leave a 5 cm gap at the top or spec a vented back panel.
2. Fully Integrated Refrigeration
Nothing says “appliance showroom” like a stainless fridge breaking up a run of cabinetry. Fully integrated refrigeration — fridge and freezer columns clad in your exact cabinet fronts, with not a millimeter of metal showing — is the single biggest visual upgrade a luxury kitchen can make. Guests literally cannot find the fridge, which is precisely the point.
The two-column setup (one full fridge, one full freezer, each 60–75 cm wide) is the designer standard — more flexible and more impressive than a single French-door unit. Panel-ready columns from premium brands sit flush with surrounding cabinetry, and the only visible cue is a whisper-thin shadow gap or a discreet handle channel.
Worth knowing: Integrated columns cost $8,000–$20,000+ for the pair including panels and installation — roughly double equivalent freestanding units. They also need proper ventilation (a grille at the plinth and top, or a vented housing) and a water line if you want through-door ice. Measure obsessively: panel gaps wider than 3–4 mm ruin the illusion.
3. The Hidden Walk-In Pantry
The ultimate concealment: an entire room you can’t see. A walk-in pantry hidden behind a flush cabinet front — or better, a jib door indistinguishable from the surrounding wall of tall units — gives you a full prep kitchen’s worth of storage without a single visible shelf. Small appliances live there permanently, bulk goods stack on open shelving, and some designs even hide a second dishwasher and prep sink inside.
The door is everything. A push-to-open flush panel with no handle, aligned to the exact grain and gap pattern of the surrounding fronts, disappears completely. Inside, go practical: open shelving (no doors to open twice), a countertop at standard 90 cm height for appliances, and brutal LED lighting on a motion sensor.
Designer tip: Budget $3,000–$8,000 for the pantry fit-out beyond the door itself, which your cabinet maker builds as part of the tall-unit run. Keep the pantry within two steps of the main prep zone — a hidden pantry across the kitchen becomes a forgotten pantry. And run the flooring straight through with no threshold: continuity sells the illusion.
4. Toe-Kick Drawers: The 10 cm You Were Wasting
Every kitchen has a 10 cm void running along the bottom of its base cabinets — the toe-kick recess. Toe-kick drawers turn that dead space into shallow, full-length drawers for the flat things that clutter drawers elsewhere: baking trays, placemats, serving boards, table linens. Press the plinth and the drawer glides out on soft-close runners.
One drawer per 60–90 cm cabinet run adds up fast: a typical kitchen gains the equivalent of an entire extra base cabinet of storage without changing the footprint by a centimeter. They’re also the perfect depth for things you use weekly but not daily — exactly the items that currently live in awkward piles.
How to do it: Toe-kick drawers add roughly $150–$300 per drawer to a cabinet order — specify them when the kitchen is planned, as retrofitting is rarely worth the labor. Keep them away from the sink and dishwasher (plumbing and moisture), and choose them for dry storage only. Label-free living: you’ll memorize the contents within a week.
5. The Concealed Coffee & Breakfast Station
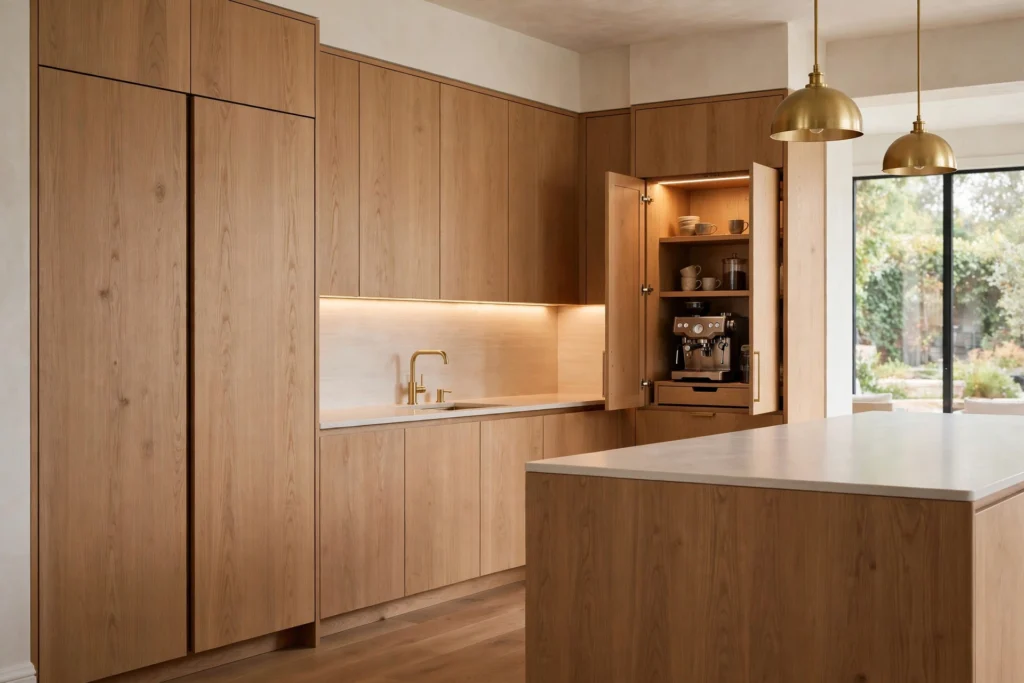
Coffee is a daily ritual that generates daily clutter: machine, grinder, beans, cups, milk. A dedicated breakfast station — a tall cabinet or a section of the pantry with pocket doors, housing the espresso machine, grinder, and cup storage with plumbing for a plumbed-in machine — keeps the entire ritual hidden. Open the doors in the morning, close them after, and the kitchen never knows coffee happened.
The luxury version plumbs the espresso machine directly (no refilling tanks) and includes a small sink for rinsing — turning the station into a self-contained bar. Pocket doors matter here more than anywhere: with the doors retracted, two people can work the station simultaneously without door swings in the way.
Worth knowing: Budget $2,000–$5,000 for the cabinetry and fit-out, plus the machine itself. Ventilation and a heat-resistant worktop inside are essential — espresso machines throw real heat. If plumbing a machine, the water line and waste need planning at first fix; decide this before floors go down, not after.
6. Pull-Out Larders & Vertical Tray Dividers
Narrow pull-out larders — 15–30 cm wide towers that slide out to reveal tiered shelves on both sides — turn filler gaps into some of the hardest-working storage in the kitchen. Spices, oils, condiments, and cans live in full view, nothing hides at the back, and the footprint is a sliver you’d otherwise lose to a filler panel.
Pair them with vertical tray dividers: simple slotted inserts in a deep drawer or tall cabinet that store baking sheets, chopping boards, and platters upright like files. It’s a $30 insert that ends the leaning-tower-of-trays chaos forever, and it works in almost any existing drawer deep enough to hold a board upright.
Designer tip: Spec at least one pull-out larder beside the hob — cooking oils and spices at arm’s reach is a genuine workflow upgrade. Budget $400–$900 per pull-out larder mechanism. For tray dividers, measure your largest board first; dividers are cheap, but a drawer that’s 2 cm too shallow is useless.
7. The Disappearing Dishwasher
A dishwasher with a cabinet front is standard in luxury kitchens — but the real move is the drawer dishwasher: one or two independent dishwasher drawers (each holding a half load) hidden behind drawer fronts. Run a small drawer after breakfast, a full-size cycle after dinner, and never look at a dishwasher fascia again.
Two single drawers beat one double for most households — you wash as you go instead of waiting for a full machine, and half-load cycles use proportionally less water and energy. The fronts match your drawer stack exactly, so the dishwasher zone reads as uninterrupted cabinetry.
How to do it: Drawer dishwashers run $1,200–$2,000 per drawer — comparable to a premium full-size machine for a pair. They need the same plumbing as a standard dishwasher, so position them near the sink. The one compromise: very tall items (stock pots, large platters) don’t fit drawers — keep one standard-depth cabinet nearby or accept hand-washing the giants.
8. Under-Island Storage Walls
The island is the biggest cabinet in the kitchen, and most islands waste half of it. A proper storage island carries deep drawers on both sides — the working side for prep tools and the seating side for the things guests actually need: placemats, serving dishes, rarely-used appliances. 90–110 cm deep islands can even hide a full appliance garage or a wine fridge in the seating-side wall.
The seating-side storage is the secret: guests help themselves to glasses or serving bowls without circling to the working side, and the island’s overhang still gives full knee clearance above shallow 30 cm-deep drawers. Everyone’s workflow improves.
Worth knowing: Island storage adds $2,000–$6,000 depending on drawer count and mechanisms. Plan the island’s electrical first — pop-up sockets and USB charging live in islands now, and they compete for the same carcass space as drawers. Draw the island in section, not just plan, before ordering.
9. Corner Solutions That Actually Work
Corners are where kitchen storage goes to die — unless you spec the mechanism that fits your corner type. For blind corners, a LeMans (kidney-shaped) pull-out swings the entire contents out into the room in one motion; for L-shaped corners, a magic-corner unit brings the back baskets forward as the door opens. Both turn the deepest, darkest cabinet in the kitchen into genuinely usable storage.
The key is matching mechanism to corner: LeMans units need a specific door width (usually 45–50 cm) and swing clearance; magic corners suit wider L-configurations. Your cabinet maker should spec these, not you — but you should insist on them, because standard corner shelves are where small appliances go to be forgotten.
Designer tip: Budget $500–$1,200 per corner mechanism. Whatever you do, don’t leave corners as empty voids or fixed shelving — in a luxury kitchen, every cubic centimeter is accounted for. If a corner truly can’t take a mechanism, convert it to a display niche or wine storage rather than dead space.
10. Clean Fronts: Handleless Cabinetry Done Right
All the concealment in the world fails if the fronts themselves are fussy. Handleless cabinetry — slab fronts with no visible hardware — is the visual foundation of the concealed kitchen. Three systems dominate: push-to-open (touch the front, it springs open), channel rails (a recessed aluminum profile at the top of each drawer gives a finger grip), and 45-degree beveled edge profiles (the front’s top edge is cut at an angle, creating a shadow-line grip).
Channel rails are the most reliable — no mechanisms to fail, comfortable for all hand sizes — while true push-to-open gives the cleanest look but needs occasional mechanism adjustment. Many designers mix: push-to-open on tall units and pantries, channel rails on the hardworking drawer stacks.
How to do it: Handleless systems add 10–20% to cabinetry cost versus standard handles. The detailing is everything: consistent 3 mm shadow gaps, grain-matched fronts on tall runs, and absolutely no handle anywhere to break the rhythm — including the dishwasher, oven, and fridge, which must be panel-ready or handleless models. One rogue bar handle ruins the entire effect.
Common Mistakes to Avoid
1. Cabinets too deep for their contents. A 60 cm-deep base cabinet with a fixed shelf is a cave — things vanish into the back and die there. If you’re not fitting pull-outs, drawers, or mechanisms, don’t order the depth. Every deep cabinet needs a retrieval system, or it’s just expensive darkness.
2. Forgetting ventilation in appliance garages. Enclosed coffee machines and microwaves pump out heat and steam. Without a vented back, a top gap, or dedicated extract, you’ll get condensation, warped cabinetry, and shortened appliance life. Ventilate every enclosed appliance bay — no exceptions.
3. Handleless without an edge detail. True flat fronts with no grip profile are beautiful and unusable — you’ll be prying drawers open with fingernails within a week. Every handleless front needs a designed grip: channel rail, beveled edge, or push mechanism. Beauty that fights you isn’t luxury.
4. The unlit pantry. A walk-in pantry or deep larder without interior lighting becomes a room you avoid. LED strips on door or motion sensors are cheap, and they determine whether your beautiful hidden storage actually gets used or just photographed once.
5. Over-customizing to today’s gadgets. Bespoke dividers molded around your current espresso machine become useless when the machine is replaced. Keep inserts adjustable and bays generously sized — design for the category (coffee station, charging drawer) not the specific model. Kitchens last 15–20 years; gadgets last 5.
Frequently Asked Questions
How much does concealed kitchen storage cost compared to standard?
Expect 25–50% more than equivalent standard cabinetry, depending on mechanisms. An appliance garage adds $800–$2,500, pull-out larders $400–$900 each, integrated refrigeration $8,000–$20,000 for the pair. The visual payoff — a kitchen with clear counters and no visible appliances — is the highest-ROI spend in luxury kitchen design.
Can I retrofit concealed storage into an existing kitchen?
Partially. Toe-kick drawers, tray dividers, pull-out larders (in filler gaps), and push-to-open conversions can retrofit. Appliance garages, integrated refrigeration, and hidden pantries need cabinetry-level changes — plan them for the renovation, not after. A good kitchen fitter can assess what’s feasible in a single visit.
Do appliance garages need ventilation?
Yes — always. Coffee machines, microwaves, and toasters generate heat and steam that will damage enclosed cabinetry without an escape route. Minimum: a 5 cm gap at the top of the bay or a vented back panel. For heavy use (plumbed espresso machines), consider a dedicated small extract fan.
Are integrated fridges reliable?
The cooling technology is identical to freestanding units from the same brand — integration changes the housing, not the compressor. The reliability questions are installation ones: proper ventilation, level fitting, and accessible water connections. Buy from established brands and have them installed by fitters who do integrated units weekly.
Is handleless practical with kids?
Mostly yes, with one caveat: push-to-open fronts show fingerprints less than you’d expect (no handles to grab means hands touch less surface), but channel rails collect crumbs in the recess. Families often choose beveled-edge profiles — easy to wipe, no recess to trap debris — or mix systems by zone.
Does concealed storage add resale value?
A calm, handleless kitchen with integrated appliances photographs dramatically better and reads as higher-end to buyers — estate agents consistently rank the kitchen as the highest-impact room for resale. You won’t recoup every dollar of a $20,000 refrigeration wall, but the overall impression of a considered, clutter-free kitchen absolutely moves valuations.
Final Thought
The concealed kitchen isn’t about hiding your life — it’s about editing it. Every appliance garage, integrated column, and toe-kick drawer is a decision that the room’s calm matters more than any single object’s convenience. And the paradox designers have known for decades: the more you hide, the more usable the kitchen becomes — because everything left visible is exactly where your hands expect it. Plan the storage first, light the insides, ventilate the motors, and let the fronts go quiet.
Explore more: Luxury Kitchen Ideas · Statement Stone Kitchen Ideas · Natural Stone Bathroom Ideas